 |
| This has nothing to do with the post, but ain't it purty???? |
My friend Tokarz has been sitting on this project for ages, saving it for the right day, and as life would have it, Friday was the day! There are hundreds of tutorials for doing this on the interwebs, so I will not be particularly precise about the process, but I had to share, because it's as if we've entered a different dimension of crafting here...it was so awesome!
My kids have had jello once, at a potluck, and they were a little skeptical about people eating it, which is funny because I am of the knox-blox generation, where jello was the perfect snack, picnic, low-brow hors d'oevre, food of choice. Anyway, you make up a bunch of the non-flavored stuff and let it harden.
Using printing ink, like Speedball (though I imagine you could experiment with acrylics or tempera, especially if you have a large group of kids), you roll on a layer of ink using a brayer. I am usually of the "just wing it" camp when it comes to specific tools, but it is hard to imagine what else would work in this situation that would not also puncture your smooth gelatin. And it was soooo smooth. And hard not to touch. But ink doesn't stick well where the gelatin has been touched...just so you know.
Once you have a thin, even layer of ink, lay your pretties on the surface. If you're using leaves, as we did, you'll want them vein down.
Lay a paper on top (we experimented with all kinds - tissue, brown craft, cardstock, old book...), and smooth it out to remove any bubbles, using your fingers, a clean brayer, or the back of a large spoon.
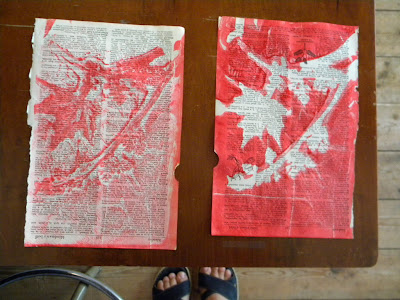
Then carefully peel off the paper to see what you've got...
Ha ha! A beautiful silhouette of leaves!!! We were giggly happy, but the fun isn't over yet!
Carefully remove your leaves from the gelatin, and place a second sheet of paper down, repeating your rubbing and smoothing.
Ahhhh! The details! So beautiful!
The girls jumped right in - Ani especially was enamored with this project and went through all kinds of experiments with her pan. (Next time I think we'll cut smaller pieces of the jello and pop them out of the pans, so each person has their own personal block to mess around with! Easier on the eager mama's stress levels, I think, to have her own than to wonder if the pan will survive an excited 7-year old's focused attention. But she totally knew how to do it and was very careful, and you know what? Gelatin is freakishly sturdy. Freakishly.)
 |
| First print |
 |
| Second print |
The second prints looked like fossils...
Sigh. This was a hard project to stop. And the wheels are turning...Esme came up with the idea of cutting out a stencil of a skull. Then she strung them and hung them to make an awesome garland...OH the possibilities!
I'm leaving town for a few days this week, but I have one of the pans of gelatin sitting in my fridge, awaiting my return...I mean, come on, that stuff has to last for years, right?
What do you do with your jello???


5 comments:
So cool! Thanks for sharing. I've never seen this before.
We make jello playdough around here :)
http://verdemama.blogspot.com/2012/08/jello-play-dough.html
WOW! Those are beautiful! And, if you get hungry as you're making the prints you can ...... forget it!! It's interesting how you seem to have a positive and negative print. Hmmm.
verdemama - that play-dough is so pretty!!! and i love the shot of your girls on and at the kitchen table, all engrossed in what they are doing...
Oh, my! How gorgeous. We must try this!!
i especially love the second printings and your different paper selections. can't wait to do this when i come home.
Post a Comment